Camping Equipment
The Backpack
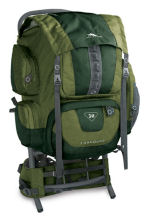 There are two general types of backpacks, an external frame and an internal frame. For most scout backpacking activities, the external
frame is the preferred choice.
There are two general types of backpacks, an external frame and an internal frame. For most scout backpacking activities, the external
frame is the preferred choice.
The external frame backpack has an external skeleton that distributes the weight of your equipment comfortably between your shoulders and hips. They are great load carriers on easy-to-moderate terrain and trails. Lots of storage space inside. Most have useful compartments, dividers and external pockets to help keep gear organized. Better air circulation between the pack and your back than with internal frame packs, keeping you cooler and more comfortable. Considerably less expensive than similarly-sized internal frame packs.
There are three steps to follow when choosing your backpack.
1. Decide On A Size
Find a pack that's big enough to hold your necessary gear, but small enough that you can carry it comfortably day after day. Remember - backpackers tend to fill up whatever bag they are packing, no matter how huge it is. Avoid a great big monster pack unless you really need one.
Storage capacities are measured in cubic inches (cu. in.). They range anywhere from a few hundred cu. in. for a small day pack to over 7,000 cu. in. for a giant, expedition-sized backpack. Most backpackers opt for medium-sized packs between 3,500 and 5,500 cubic inches.
Different manufacturers measure capacities differently. So one manufacturer's 3,000 cu. in. pack may be a bit bigger or smaller than another's. Your body size and your physical strength will limit how big a pack you can handle. A good salesperson like those at REI can help you to choose the right size.
2. Consider The Design Features
Accessibility - You want a backpack that's easy to organize, pack and unpack. The factors that affect accessibility most significantly are:
- The number of main storage compartments
- The compartment design - Is the pack a panel loader, a top loader or a combination of the two?
- The number of pockets and how they're arranged
Versatility - Most modern backpacks have capacity-altering features that help you handle a variety of different gear loads. Look for things like compression straps (to hold smaller loads in place), extending collars (to swallow more gear on longer journeys), external attachment points (for lashing extra gear to the outside of the pack) and detachable day packs/pockets.
Durability - You want a pack that will last for years. Look for durable materials, good stitching (especially around the main access zippers), reinforced bottom panels and reinforced shoulder strap anchors. Also, ask about the reputation of the manufacturers (and the specific models) you're considering.
3. Make Sure It Fits
Finding a backpack that fits well is extremely important. Always test the fit of a backpack with weight inside. Adults should use 20 to 30 pounds, with the heaviest part of the load centered between your shoulder blades, as close to your back as possible.
Try on a number of different packs before deciding on a single model. Test them with the assistance of an experienced salesperson whenever possible so that you can learn how to make minor adjustments yourself.
You want a pack that matches both your body shape and your torso length. Concentrate on:
- The Hip Belt - Arguably the most important part of the backpack, the hip belt transfers most of your pack weight to your body. It should be comfortable and sized correctly.
- Shoulder Straps - The other half of the "suspension system". These should also be comfortable and easy to adjust.
- Proper Torso Length - Torso length is the distance from the top of your shoulders to the top of your hip bones (roughly). A properly fitted pack allows you to make minor adjustments with your shoulder straps to shift load weight back and forth between these 2 weight-bearing areas.
The Sleeping Bag
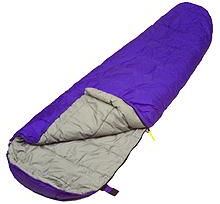 The sleeping bag is one of the scout's most important pieces of camping gear. It is always taken on every campout and plays and
important role in the well being of a scout by keeping them warm at night. Sleeping bags keep you warm by trapping and holding a layer
of "dead" (non-circulating) air next to your body. This air, which is warmed by your body heat, forms a barrier between you and colder
air and/or surfaces.
The sleeping bag is one of the scout's most important pieces of camping gear. It is always taken on every campout and plays and
important role in the well being of a scout by keeping them warm at night. Sleeping bags keep you warm by trapping and holding a layer
of "dead" (non-circulating) air next to your body. This air, which is warmed by your body heat, forms a barrier between you and colder
air and/or surfaces.
Consider the following steps when choosing your sleeping bag:
1. The Type Of Sleeping Bag
There are two main types of sleeping bags; the mummy bag and the rectangular bag. For scouting, the mummy bag is by far the best bag.
- It is light.
- It takes up little room when it is packed.
- It retains heat better.
2. Choose The Right Warmth
The warmth or "comfort" rating of a sleeping bag tells you what temperatures the bag is designed to keep you comfortable in. When deciding on the right comfort rating, follow these basic steps:
- Estimate the range of nighttime temperatures that you are likely to encounter. Most fair-weather campers sleep in temperatures between 20 and 45 degrees Fahrenheit. This will vary, however, depending upon climate, time of year and elevation.
- Adjust your estimated range up or down slightly to account for personal factors like a tendency to "sleep hot" or "sleep cold" or a preference for pajamas.
- Match your adjusted temperature range to manufacturers' suggested comfort ratings. Remember - these ratings are general guidelines only. But they will help you narrow down your choices.
Tip: Look for a bag built for temperatures at the low end of your estimated range. Why? Because it's easier to unzip your sleeping bag to cool down a little than it is to get up in the middle of the night and put on an extra layer of clothing when you're already freezing!
In southern California, a 20 degree bag will generally be adequate. On snow campouts, the scout will be advised to bring an extra blanket or double up on sleeping bags by putting one in the other.
3. Think About Insulation
The insulation inside a sleeping bag determines (to a large degree) how heavy the bag is and how much room it takes up in your pack. It can also affect how long your bag lasts. There are many different insulations (or "fills") available today. Your options are:
-
Natural insulation (Goose Down)
- Positives - The lightest, most efficient, most compressible and longest lasting insulation available!
- Negatives - An inefficient insulator when wet, and it takes a long time to dry. Not the best choice for backpacking in wet climates or during wet times of the year. Down is also more expensive than synthetic fills.
-
Synthetic insulation
- Positives - Insulate more effectively than down when wet (they still provide only marginal performance, but it's better than nothing). Dry more quickly than down and cost less.
- Negatives - Synthetic insulation can't match the overall performance of down in cold, dry conditions (though some of them come close). Tend to be less durable.
There are a wide variety of synthetic insulations. To compare them, you must consider their loft (the amount of dead air that they can trap), their weight and their compressibility (how tightly it can be packed down for storage). Durability (how long an insulation can maintain its loft before it begins to break down and trap less dead air) is also important. The world of synthetic insulations is always changing, as manufacturers create lighter, loftier and more durable insulations. This means the bags you have to choose from are better than ever. But it a lso means that comparing specific insulations against one another can be challenging. A good salesperson like those at REI can help you to choose the right type of sleeping bag.
4. Consider The Extras
Most of the "extra" features available in modern sleeping bags help you hold in more of your hard-earned body heat. These features allow you to carry lighter, less bulky bags, yet still stay warm when the temperature drops.
- Hood - You can lose up to 50% of your body heat through your head. A hood traps this warmth and holds it in -- it should be considered essential on all cold-weather bags (+35 degrees or lower). Make sure the hood you choose is comfortable, snug and easy to adjust.
- Collar - This is a big neck gasket (located at shoulder level inside the sleeping bag) that helps hold heat inside the bag. They are usually found in cold-weather sleeping bags.
- Draft Tubes - This is an insulation-filled tube that runs alongside the main sleeping bag zipper to keep warmth from escaping. They are most commonly found on moderate- to cold-weather bags.
5. Check Out The Sleeping Bag For Size
To find out if a sleeping bag is the right size for you, hop in and try it out. It should be roomy enough to be comfortable, yet snug enough that you don't have lots of extra space to warm up. Check the length as well. Most sleeping bags are available in 2 standard lengths: "regular", which fits adults up to about 6'0" and "long", which fits adults up to about 6'6". However, some bags are available in extra-long cuts, while others are built specifically for women, short adults and even children.
The Sleeping Pad
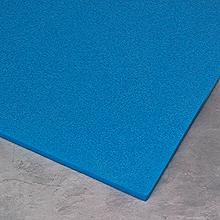 Sleeping pads perform 2 important functions - first, they provide an important layer of insulation between you and the ground (to cut down
on conductive heat loss). Second, they help keep you comfortable when you're sleeping on hard, uneven ground.
Sleeping pads perform 2 important functions - first, they provide an important layer of insulation between you and the ground (to cut down
on conductive heat loss). Second, they help keep you comfortable when you're sleeping on hard, uneven ground.
Sleeping pads insulate the same way that sleeping bags and clothing layers do. They trap and hold a layer of dead (non-circulating) air between your body and the cold (in this case, the cold ground). Your body gradually warms this layer of dead air and it becomes an insulating barrier.
The insulative performance of a pad depends upon how much air it holds inside and how free that air is to circulate.
Although there are several types, the closed-cell foam pads made out of dense foam filled with tiny closed air cells is the best for scouting. They're cheap, durable (won't pop when tromped on) and extremely insulative (almost no circulation of air in pad, so they can be cut thin yet still provide good insulation). Closed-cell foam is also non-absorbent.
For the adult scouter who needs additional comfort, there are self-inflating pads. These are open-cell foam pads wrapped in air-tight, waterproof nylon shells. They are more expensive, heavier and can be punctured, but they can make the difference in a good nights sleep for the less limber.
The Tent
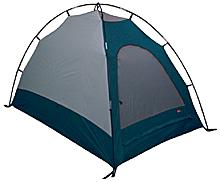 We are lucky in southern California because we generally have very good weather for our campouts. Because of this, we do not
have to choose the top of the line tents. A good place to buy a tent is from Big 5. They have a very nice rectangular mid-size
tent that costs between $50 and $60.
We are lucky in southern California because we generally have very good weather for our campouts. Because of this, we do not
have to choose the top of the line tents. A good place to buy a tent is from Big 5. They have a very nice rectangular mid-size
tent that costs between $50 and $60.
There are four steps to follow when choosing your tent.
1. Decide On A Size
Tents come several sizes but for basic scouting the mid-size tent is the best. These versatile tents are designed for 2 to 3 people. Most are compact and light enough to be carried on solo trips, yet provide enough room for backpackers to share on multi-person journeys. The shape of the bottom is usually rectangular or six-sided. The rectangular tents tend to provide a better use of space than six-sided tents.
2. Consider Weather Protection and Ventilation
Tents perform 2 basic tasks: they protect you from the elements (rain, wind, snow) and to keep you comfortable in varying temperatures. Since these 2 tasks are often at odds with one another, most tents are built to perform one better than the other.
-
Warm-weather tents
These are designed for use in mild conditions only. They place a premium on ventilation, with lots of mesh panels and openings for good air flow. Warm-weather tents are usually lightweight and compact. But they are less weatherproof than the other options listed below. Warm-weather tents are most effective in warm, dry climates, where chance of significant wind/rain/snow is low. -
General backpacking tents (also referred to as 3-season tents)
General backpacking tents are designed to provide good ventilation and weather protection in a wide variety of weather conditions (usually everything but snow). They're perfect for recreational, multi-season backpacking, since they're built to handle the situations and conditions that most recreational backpackers run into. They tend to be heavier than warm-weather tents. -
Winter backpacking tents (also referred to as 4-season tents)
Winter tents are designed to handle cold winds and winter conditions. They are made out of durable, weatherproof materials, with sturdy pole configurations and low profiles to handle high winds and built-up snow. Winter tents tend to be less breathable than general backpacking tents, but more water- and weatherproof. They also tend to be somewhat heavier and bulkier, and would seldom be needed in Southern California.
3. Pick The Right Shape
The design or "shape" of a tent affects how sturdy it is, how roomy it is inside and how much it weighs. There are hundreds of options to choose from. To choose between them, consider the following:
-
Usable space -
Get as much as you can! Consider the angle of the tent walls, the amount of headroom inside and the shape of the floor (for sleeping). Keep your eyes open for space-enhancing features like vestibules or gear lofts, too. -
Profile -
Tents with high profiles tend to have lots of headroom and space to maneuver inside. But they may not last long in high wind and rough weather. Lower profile tents are more cramped, but they're sturdier in harsh conditions. -
Structural support -
Tents with lots of poles tend to stand up to the elements more effectively and provide more usable space inside (less drooping, sagging panels). But more poles means longer set up times, more pieces to get lost/broken and more weight to carry around. -
Tautness -
A tightly stretched tent is more resistant to the wind, quieter (less flapping) and more effective at shedding precipitation. But beware--if it takes lots of poles to stretch the tent tight, it may not be worth the added weight and bulk. -
Access -
Look for tent doors that are easy to open, easy to close and easy to get in and out of. Multiple doors make access even easier and can improve ventilation. -
Freestanding vs. stake-down -
Freestanding tents are convenient, easy to pitch and easy to move around your campsite. They require staking only to keep them from blowing away. Stake-down tents must be staked to remain erect. But they don't require as many poles, so they tend to weigh less than similar freestanding models.
4. Use the "Other" Variables To Decide
Once you've addressed the most important tent variables (size, weatherproofness, ventilation, shape), decide between your finalists by comparing:
-
Weight -
Choose the lightest tent you can that satisfies your needs. General backpacking tents should weigh no more than 3 pounds per person. -
Ease of set up -
Set up each tent if possible. See how long it takes, how many steps are involved, how many people it requires. -
Extra features -
Keep your eyes open for helpful extras like roomy vestibules, inside wall pockets, gear lofts and convenient vent windows. -
Quality of workmanship -
Look for solid stitching throughout the tent, taped floor and fly seams, well-installed zippers (no puckers) and reinforced stress points. -
Cost -
Basic tents are easy on the wallet but short on extra features. Deluxe models will cost more but will provide more of the comforts of home.
The Ground Cloth
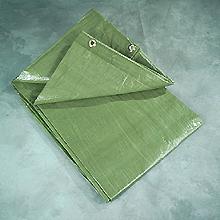 One of the easiest ways to extend the life of your tent is to use a ground cloth. These lightweight, waterproof barriers slip between the
ground and your tent to keep the tent floor dry and protected from wear and tear.
One of the easiest ways to extend the life of your tent is to use a ground cloth. These lightweight, waterproof barriers slip between the
ground and your tent to keep the tent floor dry and protected from wear and tear.
Ground cloths should be tough, lightweight and waterproof. They should also be slightly smaller than your tent floor so rain water can't collect along the tent edges and pool up underneath.
Choose a Material
- Plastic - Plastic is inexpensive, lightweight and easy to find. Sheets come in a variety of sizes and thicknesses. Avoid thin layers -- they tend to tear and puncture easily.
- Coated Nylon - Coated nylon cloth is more durable than most plastics, but more expensive. It is also available in a variety of types (ripstop, taffeta).
What Are My Options?
- Pre-made ground cloths are convenient, durable and best of all, they're already shaped to fit specific tent floors. Most are made out of coated nylon. REI carries a variety of these pre-cut cloths to match the tents they sell.
- Standard rectangular tarps can be used as ground cloths as well. Most are made of plastic, so they are less expensive. But they can be bulky and difficult to pack. Use the smallest tarp that protects your tent floor. And remember to tuck the edges under the tent.
- Homemade ground cloths are also an option. Just cut your own from a single, seamless piece of waterproof material. Make it slightly smaller than the tent floor it's designed to protect.
Hiking Boots
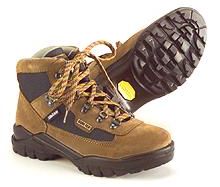 Choosing the right type of boot is certainly important. However, upon joining a troop, most scouts can use either a lightweight or
midweight hiking boot. As they mature, some will be interested in the "big" hikes. It is only these few scouts taht will need a heavy
boot. The following information goes into greater depth that most will not need but has been included for those few that are interested.
Choosing the right type of boot is certainly important. However, upon joining a troop, most scouts can use either a lightweight or
midweight hiking boot. As they mature, some will be interested in the "big" hikes. It is only these few scouts taht will need a heavy
boot. The following information goes into greater depth that most will not need but has been included for those few that are interested.
Some of the key considerations are:
1. Consider the Kinds of Trips You Have Planned
Outdoor footwear can be divided into 3 basic categories. Begin your search for the right boots or shoes by focusing on the category that best matches your backpacking plans.
- Lightweight hiking - These boots (and trail shoes) are designed for day hiking and very short overnight trips only. They stress comfort, cushioning and breathability. As a result, they are less supportive and durable than the options below.
- Midweight hiking/backpacking - These boots are designed for on- and off-trail hiking with light to moderate backpacking loads. They are more durable and supportive than lightweight hiking boots, but they are still intended primarily for short to moderate trips over easy to moderate terrain.
- Extended backpacking/mountaineering - These boots are designed for on and off trail hiking with moderate to heavy backpacking loads. They are designed with multi-day trips in mind. Durable and supportive, they provide a high degree of ankle and foot protection. Some of these models are designed specifically for rough terrain with heavy backpacking loads. They offer the very best in durability, support and protection. Some are stiff enough to accept crampons for snow/ice travel.
2. Consider the Materials
The materials used in a given boot or trail shoe will affect its weight, breathability, durability and water-resistance. Since boots made of different fabrics can be very similar in performance, however, personal preference is often the key when choosing between them.
- Nylon mesh and split grain leather - Nylon and split-grain leather boots are lightweight and breathable, which makes them perfect for warm to moderate weather use and short to moderate backpacking trips. They tend to be softer on your feet, they take less time to break in, and they are almost always lighter than full-grain leather boots. They also cost less. Unfortunately, nylon/split grain boots tend to be less water-resistant than full-grain leather boots (although styles that feature waterproof liners can be just as water-tight, if not more so).
- Full-grain leather - Full-grain leather is extremely water-resistant, durable and supportive (more so than split-grain leather or nylon). It's used primarily in backpacking boots designed for extended trips, heavy loads and hard terrain. Not as lightweight or breathable as nylon/split grain combinations, but it typically lasts far longer. Full-grain leather usually requires a break-in period.
- Waterproof barriers - Lightweight, waterproof barriers (like Gore-Tex®) are built into many hiking boots to enhance their water resistance. These barriers are available in a variety of boot styles, from lightweight hikers to extended hiking/backpacking models. Waterproof performance depends upon the type of barrier used, the materials protecting it and how well the boots/shoes are taken care of. If cared for correctly, these waterproof barriers often last longer than the boots themselves.
NOTE: Be careful when shopping for backpacking boots to differentiate between the following:
- Waterproof leather - This is leather that's been treated to be waterproof. It's great stuff to have, but remember -- leaks may still occur (depending on how well the boot pieces are put together).
- Waterproof (or water-tight) construction -- This refers to construction techniques designed to keep leaks out (like seam-sealing, special stitches and precise designs). Water-tight construction is typically combined with waterproofed materials.
- Waterproof liners -- These are the special waterproof barriers described above that are built right into the boot to protect you from whatever leaks make it through the boot materials. These liners typically do a great job of keeping you dry. But remember, Gore-Tex (and the others) don't last forever.
TIP: The water-proofness (or water-resistance) of your hiking boots depends significantly on how well you treat them. Be sure to follow all care instructions that come with your boots so that they can perform well and last a long time.
3. Consider the Way the Boots are Constructed
-
Upper construction
- The more seams a boot or shoe has, the higher the risk for leaks and/or blow-outs. Leaking occurs when water seeps through the needle-holes or spaces between the boot panels. Blow-outs occur when general wear, repeated flexing or a snag causes a stitch to break and 2 panels to separate. In general, the less seams an upper has, the more water-resistant and more durable it will be.
-
Connection between the upper and the sole
-
Hiking boot soles are either stitched or cemented to the rest of the boot.
- Stitching - Durable, reliable, can be undone to replace the sole once it has worn down. Different techniques (Littleway, Norwegian) result in different strengths and stiffnesses.
- Cementing - Faster and less expensive than stitching, resulting in lower boot prices. It hasn't always been reliable, but most modern methods produce durable, lost-lasting bonds (depending upon the process and specific glue used). Most cemented boots can now be resoled just like traditional stitch-down models.
-
Hiking boot soles are either stitched or cemented to the rest of the boot.
4. Test for Fit
Once you've narrowed down your options to a handful of boots or shoes, the best way to decide between them is to try them on. Don't rely solely on your "regular" shoe size when searching for the best fitting boots or shoes. One manufacturer's "9" may vary widely from another's (see below). Use the fitting tips below.
- Begin with a foot measurement - Have an experienced salesperson measure both of your feet using a Brannock device (a good place for this is REI). Use these measurements as your starting point for trying on boots. If one foot is larger than the other (which is quite common), fit your larger foot first. You may need to use extra socks or an insert to take up extra space in the other boot.
- Pick the right socks - Wear the type of socks and sock liners that you'll be using out on the trail whenever you try on boots. Check the initial fit - Lace up the boots and stand up. They should feel snug around the ball and instep of your foot, but loose enough that flexing your foot forward is not uncomfortable. Your heel should be held firmly in place. If your foot feels like it's "floating" inside the boot, try a half size down. If your foot feels cramped or your toes make contact with the front or sides of the toe box, try the next bigger size.
- Take a walk - Take a walk and see how comfortable the boots/shoes are. Check for any looseness, foot movement and/or heel lift. Good-fitting boots will hold your feet firmly in place without binding or pinching them. New boots may feels a little stiff at first, but they should still be comfortable. After a quick walk across a flat surface, step onto an incline facing downhill (if one is available) to check for foot slippage. Your feet should not slide forward easily, nor should you be able to move your heel from side to side. If either of these is possible, try a smaller (or lower volume) boot. If your toes make contact with the front of the boot without much forward movement, try a larger size or a different boot.
- Investigate your options - Try on a number of boot models before you decide on a single pair, even if the first pair feels good. Every boot model is built around a different "last" (standard foot shape), so each one will grab you a little differently.
Caring for your Hiking Boots
All hiking boots, especially leather ones, benefit from frequent cleaning and occasional conditioning with special boot treatments. These treatments condition leather and provide additional water protection to keep your feet dry.
Proper boot care and conditioning is important whether you hike in dry, hot climates or wet, temperate areas. Taking a little extra time to care for your hiking boots can add years to their useful lives.
Basic Boot Care
The key to keeping your boots in good shape is to keep them as clean as possible. Dirt particles are very abrasive and over time they can damage just about any boot material. It's hard to keep your hiking boots clean while you're using them, of course, but brushing the dirt and mud off them after every hike will help keep them in good condition.
Drying your Boots
Whenever possible, dry your boots completely after each trip. To dry them, simply store them in a dry, warm area. Don't set your boots near a fire (or other heat source) to dry them more quickly, since high temperatures can damage boot materials and the cements used to hold them together. If you need to speed up the drying process, try stuffing dry newspaper inside your boots to absorb water. Replace the newspaper frequently for best results.
NOTE: If your boots are wet and dirty, it's best to dry them first, then brush the dirt off.
Washing your Boots
Most fabric boots can be washed on the outside with non-detergent soap and water to remove built-up dirt. Leather boots can also be rinsed off, but repeated washing and drying can dry out the leather over time and make it brittle.
Treating/Conditioning your Boots
A variety of boot treatments are available to condition the leather (and other materials) in your hiking boots. Most of these treatments are also formulated to enhance water-repellency. Boot treatments come in spray, liquid and paste form.
Different types of treatments are intended for different types of boot materials. To help you find the best match for your boots, stores such as REI include specific treatment suggestions in our Footwear Spec Charts (see the bottom of this page for links). Refer to the manufacturer's care instructions for specific details on how to use these products.
To condition your boots correctly, simply follow the instructions included with each boot treatment. The number of times you have to apply the treatment each season will depend the boots you own, how often you use them and the specific treatment you choose.
A Note on Oil Treatments
Avoid using oil-based treatments like Mink Oil on any leather hiking boots. Oil-based products are intended to soften leathers and make them more supple, which can negatively affect the support of hiking boots. Use wax or silicone-based treatments only.
Hiking Socks
The socks you wear on the trail can have a significant effect on your backpacking experience. Like footwear, socks must be chosen carefully to match the kinds of conditions you expect.
1. Consider the Kinds of Trips You Have in Mind
Backpacking socks are designed to provide warmth, cushioning and abrasion resistance in a variety of conditions. The right sock for you depends on the kinds of trips you have planned and the weather conditions you expect. Here are the basic categories to choose from:
- Liners - Sock liners are thin, lightweight wicking socks designed to be worn right next to your skin. These liners wick sweat away from the surface of your foot to keep you dry and more comfortable. Liners also limit the amount of abrasion between your outer sock and your skin. They are designed to be worn under other socks.
- Lightweight hiking/backpacking socks - Designed for warm conditions and easy trails, lightweight backpacking socks stress wicking performance and comfort over warmth. These socks are thicker, warmer and more durable than liners alone. They also provide more cushioning. But they are relatively thin so that you can stay comfortable on warm weather trips. Because most lightweight backpacking socks are made from wicking materials, they can be worn with or without liner socks.
- Midweight hiking/backpacking socks - These socks are designed to provide reliable cushioning and insulation in moderate to cold conditions. They tend to be thicker and warmer than lightweight hiking socks. Many models have extra padding built into high-impact areas like the heel and the ball of the foot for maximum comfort. These socks should be worn with liners. Mountaineering socks - Mountaineering socks are the thickest, warmest and most cushioned socks available. They are designed for long trips, tough terrain and cold temperatures. Usually, mountaineering socks are too thick and warm for basic backpacking journeys in warm conditions.
2. Consider Your Material Options
- Wool - Wool is an extremely popular natural sock material. It is warm, cushioning, and retains heat when wet. Unfortunately, wool can take a long time to dry and it can be scratchy next to your skin (NOTE: many new wool options, including mohair, do not have this problem). It can also wear out quickly if not reinforced with other materials. Wool blends (combinations of wool and synthetic materials) are extremely popular because they address many of these problems.
- Synthetic insulating materials - REI offers a number of man-made materials designed to insulate like wool and wick moisture, without the negatives mentioned above. These materials (Hollofil®, Thermax®, Thermastat®) trap warmth like wool, but they are softer on the skin. They also dry more quickly and are more abrasion resistant. These materials are available in a variety of sock styles and thicknesses.
- Silk - Silk is a natural insulator. It's comfortable and lightweight, but not as durable as other options. It's occasionally used in sock liners for reliable wicking. Synthetics wicking materials - The synthetic wicking materials (like polypropylene and Coolmax) used in wicking sock liners are often woven into thicker backpacking socks as well, to enhance wicking performance.
- Cotton - 100% cotton is not recommended as a sock material for backpacking. Cotton absorbs sweat, dries slowly, provides no insulation when wet and it can lead to discomfort and blisters out on the trail. However, cotton is extremely comfortable. And when combined with wool or other wicking and insulating fibers, cotton can be a great choice for light hiking in summer.
- Cushioning materials - Many backpacking socks provide extra cushioning around the heel, the ball of the foot and the toe area to increase comfort. The padding is created either by increasing the density of the weave in those areas, or in some cases by weaving long-wearing materials like acrylic into those areas. This extra padding can be a real foot-saver on hard trips over rough terrain.
- Support materials - Many of today's hiking socks include a small percentage of either stretch nylon or Lycra® spandex. These elastic materials help socks hold their shape and keep bunching and wrinkling to a minimum.
3. Take a Test Drive
When possible, take a quick walk in the sock styles you are considering to get a feel for how much cushioning they have. And be sure to buy the right size--your socks should fit snugly. Bunched up sock material can make any backpacking trip an uncomfortable one.
The Backpacking Stove
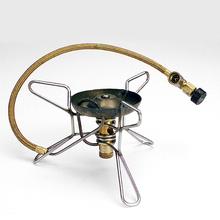 Although patrol cooking is an important part of scouting, outings are also planned that involve individual or crew (a small group) cooking.
For these times, it is good to have a backpack stove. As always, there are many types of stoves to choose from but there are certain types
that work better for most scouts.
Although patrol cooking is an important part of scouting, outings are also planned that involve individual or crew (a small group) cooking.
For these times, it is good to have a backpack stove. As always, there are many types of stoves to choose from but there are certain types
that work better for most scouts.
Some of the key considerations are:
1. Size Considerations
Backpacking stoves come in a variety of sizes -- from lightweight micro-stoves that fit in your pocket to two-burner platforms that barely fit in your trunk. In general, stick with the lightest, most compact model you can find, unless your plans include short trips, big meals and large groups of people.
To save space and weight in your pack, look for stoves that:
- Can be disconnected from their fuel supply - Many stoves can be unhooked from external fuel bottles for easier storage in your backpack and less chance of breakage.
- Fold up/collapse - The legs, base supports and pot holder arms of many backpacking stoves can be collapsed or folded for easier packing.
- Fit inside of cookware - Some stoves are designed to fit inside of popular cook sets. This can be a great space-saver (be sure to bring a plastic bag to put your stove in so no fuel spills onto your pots and pans).
2. Consider Fuel Options
Before you look at specific stove models, take a few minutes to decide which type (or types) of fuel will work best for you. This will help you narrow down your options:
-
Butane and butane blends - (Compressed gas)
- Positives
- Convenient, clean-burning and easy to light.
- Burn hot immediately, do not require priming.
- Can be adjusted easily for simmering.
- Can't spill.
- Negatives
- More expensive than other fuel types.
- You must carry and dispose of the fuel canisters (most are non-recyclable).
- Performance may decrease in temperatures below freezing (blended alternatives - Butane/Propane and Isobutane - work better than straight Butane in cold conditions. Pure propane works well down to 0 Degrees F. Butane will not work below 32 Degrees F).
- Overall review
- Great for warm to moderate weather campers who want easy adjustability, few hassles and who don't mind carrying a little extra weight in their packs.
- This is the best option for a scout because it is the safest and easiest to use.
- Positives
-
White gas - (Liquid)
- Positives
- Inexpensive, easy to find throughout the United States.
- Clean, easy to light, spilled fuel evaporates quickly.
- Negatives
- Volatile (spilled fuel can ignite quickly).
- Priming is required (fuel from the stove can be used)
- Can be hard to find outside of the United States.
- Overall review
- A great overall performer, perfect for travel throughout North America in just about any weather conditions.
- Reliable, inexpensive and efficient.
- This is a good option for an adult scouter or a very experienced scout.
- Positives
-
Kerosene - (Liquid)
- Positives
- Inexpensive, easy to find (throughout the world).
- High heat output.
- Spilled fuel does not ignite easily.
- Negatives
- Somewhat messy (burns dirty, smelly).
- Priming is required (easier if a different priming fuel is used).
- Tends to gum up stove parts.
- Spilled fuel evaporates slowly.
- Overall review
- A cheap, versatile fuel choice, especially for backpackers who plan on traveling outside of the United States (where white gas and Butane blends may not be readily available).
- Not as clean or easy to deal with as butane or white gas.
- Positives
-
Denatured Alcohol - (Liquid)
- Positives
- A renewable fuel resource, low volatility.
- Burns almost silently.
- Alcohol-burning stoves tend to have fewer moving parts than other types, lowering the chance of breakdown.
- Negatives
- Lower heat output, so cooking takes longer and requires more fuel.
- Fuel can be hard to find outside of the US and Canada.
- Overall review
- A viable, environmentally-friendly option for travel in the US and Canada, especially if you crave peace, quiet and a slow pace on your backpacking trips.
- Positives
3. Look For A Stove Design That Works For You
Backpacking stoves come in all kinds of shapes, sizes and designs. Once you've decided on a general size and fuel type, take a look at your options and ask yourself or someone like an REI salesperson:
- How easy is the stove to set up?
- Does it require assembly every time it's used?
- If so, is the assembly easy or complex?
- Is the stove sturdy?
- Is it stable on uneven ground?
- How hard is it to balance a pot on top?
- If a gas canister is used, is it easy to attach and remove?
- Can it be detached before it's completely empty?
- How easy is the stove to light?
- Does it require priming?
- Can it be primed with fuel from the stove itself?
- How easy is the stove to control?
- Can the heat output be adjusted easily?
- Will the stove simmer?
- How easy is the stove to maintain in the field?
- Can I handle basic maintenance myself?
4. Consider Performance
Finally, once you've narrowed down your stove choice to a handful of specific models, consider their overall performance. A good way to do this is with REI's online stove comparison chart or the in-store printed comparison chart. Consider variables like:
- Average boiling time - This measures how hot the stove burns.
- Water boiled per pint of fuel - This measures how efficient the stove is. It's like comparing cars based on how many miles-to-the-gallon they get.
- Burn time at maximum flame - This measures how long the stove will burn on a given supply of fuel before it has to be refilled.
Hints for improving your stove's performance:
- Use a lid when cooking.
- Use a windscreen.
- Use a heat-exchanger on trips of more than a few days (to improve fuel economy).
- Use alcohol for priming (this will help keep your stove soot-free).
- Learn how to clean and maintain your stove properly.
- Use a coffee filter to filter all of your liquid fuel before use.
- Use the sun or body heat to melt snow (rather than your stove).
Cookware
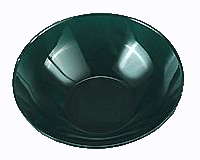 Most outings in scouts occur over a weekend. These short trips and simple menus will require the basics only.
- Single pot, with a lid that can double as a plate
- Cup
- Basic utensils (spoon and knife)
- Some way to pick the pot up (either a handle, bail or pot-grabber)
Water Filter or Purifier
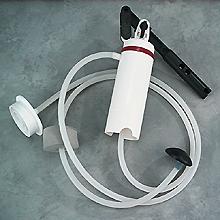 As a scout builds their strength and interest in backpacking, a water filter or purifier becomes a piece of equipment that
they will either need to have or be able to share. It is not a piece of equipment that a new scout needs to purchase. This being
said, lightweight, compact water filters and purifiers have become extremely popular in recent years. These devices are convenient,
easy-to-use, and best of all, they're quick. But how do you choose the right one?
As a scout builds their strength and interest in backpacking, a water filter or purifier becomes a piece of equipment that
they will either need to have or be able to share. It is not a piece of equipment that a new scout needs to purchase. This being
said, lightweight, compact water filters and purifiers have become extremely popular in recent years. These devices are convenient,
easy-to-use, and best of all, they're quick. But how do you choose the right one?
1. Consider How Much Protection You Want
It's impossible to know for sure if a given water supply is free of contamination. But bacterial and protozoan contamination has been estimated to be present in 90% of the United States' surface water. And water-borne viruses may be found anywhere where humans have come into contact with the water supply.
Filters - All of the water filters that REI carries provide reliable protection against bacteria and protozoa (one new model also provides reliable protection against viruses!). Filters are the easiest, most economical method of making water safe to drink in situations where viral protection is not needed.
A Note on Pore Size: The size of the holes, or "pores", in a filter determine which microorganisms get caught and which sneak through. Most filters have a small range of hole sizes. Absolute pore size refers to the size of the largest (least effective) holes. This measurement tells you which critters will be caught and which won't.
Unfortunately, some manufacturers advertise nominal (average) pore sizes instead of absolute sizes, which can make the whole pore size issue very complex. When comparing the effectiveness of different filters, concentrate instead on which water-borne nasties the unit claims to eliminate and which it doesn't.
Every water filter (and purifier) that REI sells has packaging that describes which microorganisms it can protect you from. Be sure to read this information carefully before choosing a specific model.
Purifiers - Water purifiers offer the very best protection available from contaminated water in the backcountry. Purifiers usually provide reliable protection against bacteria, protozoa and viruses. But is this extra protection worth the extra cost? It depends on your plans.
You are at risk for viral infection any time humans have come into contact with your water supply (NOTE: viruses can be spread by everything from urinating to brushing your teeth to spitting in a stream). This means situations like:
- Crowded recreation areas where sanitation systems may become overloaded from time to time.
- Areas where infants may be in the water.
- Backcountry sites where backcountry visitors may not have disposed of their waste properly.
- Developing countries with basic sanitation systems.
- Areas that are susceptible to natural disasters like floods and earthquakes (which could overwhelm sanitation systems).
Quite simply, purifiers are the best choice for any backcountry traveler who doesn't want to take any chances with their water supplies. Remember - you never know for sure what's been going on upstream!
2. Consider How Much Water You'll Need
If you only backpack a few times a year, focus your attention on smaller, less expensive filters/purifiers designed to handle a limited amount of water. You may need to replace the filter elements in these models from time to time, but you'll still come out ahead in the long run. If you plan on using your filter/purifier more often (10-20 times a year), it may be more cost effective for you to choose a more expensive unit that's designed to last longer between filter replacements.
Also keep in mind as you compare filter/purifier models that different designs work at different speeds. If your trip plans involve difficult terrain, dry conditions and/or large groups of people, look for a model that can process a lot of water quickly. If you're planning shorter trips and/or smaller groups, you maybe happier with a lighter, smaller, less expensive model.
3. Consider Size and Weight
Keep in mind that you'll be carrying your filter/purifier everywhere you go. Balance your desire for high water output and ease of use with your desire to keep your backpack light.
4. Consider Ease of Operation
Water filters/purifiers come in a variety of styles. When performance levels are similar, the decision between them is often a matter of personal taste. To decide between models, consider how easy each one is to use. Ask yourself questions like:
- How easy is the filter/purifier to set up and operate? If it's a pump design, how easy is it to pump?
- Can it be operated easily by a single person? (try it out for yourself and see!)
- Is it possible to connect a water container directly to the unit? If not, how easy is it to get the treated water into your water jug?
- Can the filter unit be cleaned to extend its usable life? How easy is it to do?
- What about basic maintenance procedures? Can common problems be fixed in the field?
NOTE: If you plan on setting up camp and staying put for a while, you may want to consider a large-volume, gravity-driven system instead of one that you have to pump. Gravity-driven systems tend to be bulkier and slower than hand-held units. But they can process a large volume of water while you're out exploring, and you don't have to lift a finger!
5. Consider Cost
The most expensive water filters/purifiers are often the most cost-efficient when you consider their performance and longevity. If you plan on backpacking for a number of years, consider paying a little more up front so you can save money further down the trail. When comparing costs, look at:
- The overall price of the unit.
- The amount of water that it can treat before the filter must be replaced.
- The cost of replacement filter/chemical elements.
Also keep in mind that some filter/purifier elements can be "scrubbed" from time to time to clean out pores and extend their useful life. Others cannot.
- Pre-filter - Usually located at the end of the intake hose or just before the main filter. Pre-filters strain out the largest particles and cut down on wear and tear to your main filter element. Most pre-filters can be rinsed from time to time to remove caught particles.
- Depth Filter - These are blocks of filtering material, honeycombed with small passages. Water flows through the passages and microorganisms are caught inside. Some depth filters can be cleaned to improve longevity, others cannot.
- Surface/Membrane Filter - Membrane filters are perforated surfaces that strain out particles as the water passes through. Surface/membrane filters cannot be scrubbed clean.